|
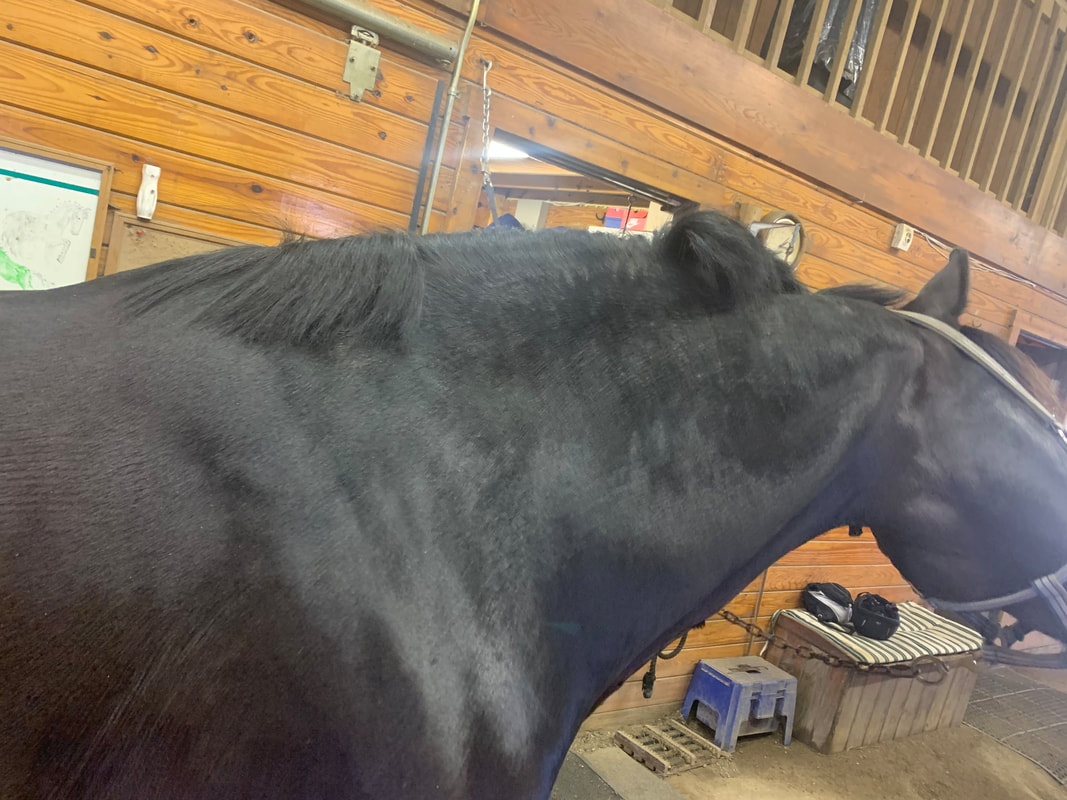
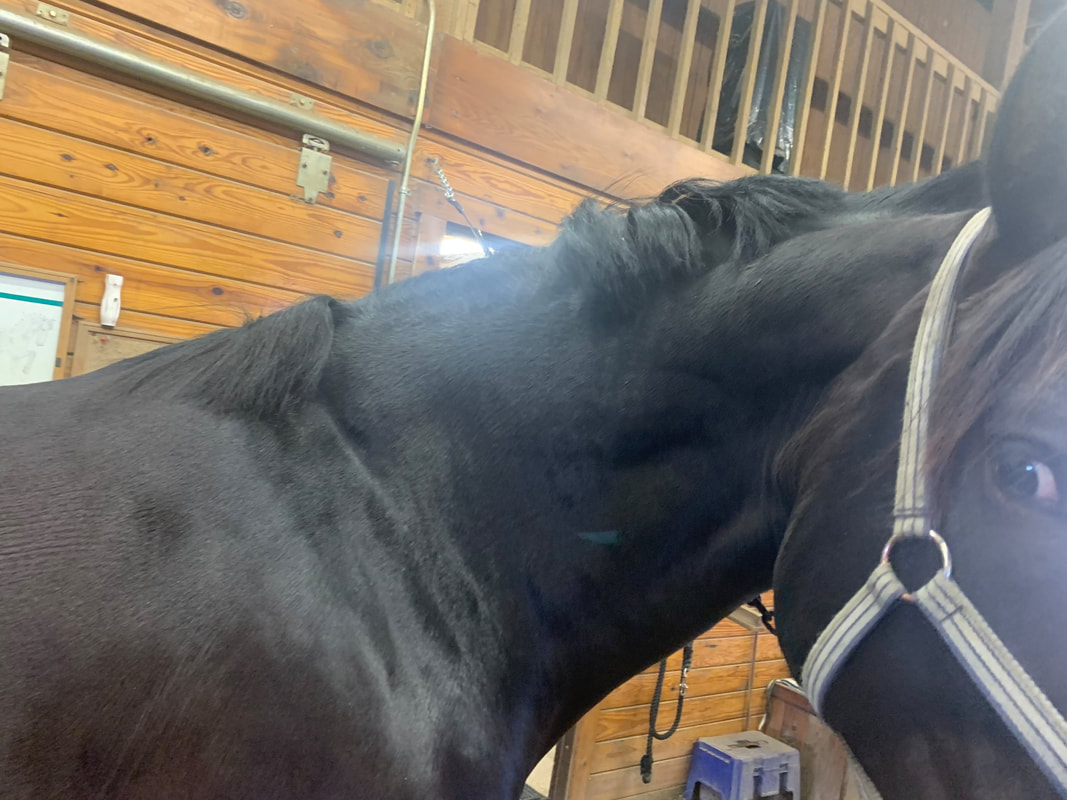
Why does my horse get faster when i am riding them? Are you riding your horse’s body? Have you ever wondered if you are riding your horse’s body? Do you know what that means and why it is important? In this blog, I am going to share the concept of ‘riding your horse’s body’ in more detail along with a few exercises to help you become more aware of what this should feel like. The Conformation of the horse was never really meant to be ridden. This is something we humans came up with for our convenience. Some research has indicated that we should not have more than 120 pounds on a horse’s back including the tack. Therefore, riding centered, balanced, and correctly is pertinent to the health and longevity of the horse. The weakest part of a horse’s body is where we sit on their back. I refer to this area as the ‘bridge.’ The reason I call it the ‘bridge’ is because the horse's ribs and vertebrae are what connect the hips to the shoulder. Have you ever sat on your horse and it feels as though one stirrup is shorter than the other? Usually, it feels like the left is shorter than the right. The reason you feel this is because the ribs are pushed to one side as opposed to the other. For example: Sit on your horse and you should feel that your right leg does not have as much pressure under your calf area as your left calf does. That is because on the right side of your horse it is their ribs in their shoulder area that are pushed out against your thigh, not your calf. Then on the left side, you will feel more pressure under your calf. Each side has ribs that are pushed out further on that side and not the other. Think about it, when you ride your horse to the right your horse usually falls in with their shoulders leading and when you ride to the left side your horse tends to lead with their haunches. This is why your left stirrup usually feels shorter. Your horse’s last eight ribs are pushing against your calf. Go ahead try it, it is a very cool feeling. (Down below, you can see a picture of the left belly pushing out the rider's left calf.) So, back to riding your horse's body. As you are sitting on your horse and on the left side, their ribs are pushing out up against your calf, that is a place where your horse is not truly straight and on the right side, the ribs under the shoulder (your thigh area and girth area) are pushing out and putting pressure on your thigh. This too is another place that they are not straight. All this keeps us from connecting the hips to the shoulders, which then would allow us to connect the bridge, make our horses straight, and then build a place for us to sit. Here is another cool exercise to be able to see the bridge up and connecting the hips to the shoulders: Take a hoof pick and scratch under your horse's belly from between their front legs (the girth area) to the middle of their belly. Watch how tall they get and see the bridge connect between the wither and shoulder area to the hips. When your horse is fine with this, then get on your horse and have someone do it while you're sitting on them in the saddle. (You don’t want to do this bareback because the horse doesn’t have the muscle to support you for the bridge to come up). This is what you want to feel when you are riding your horse. This is the bridge that connects the hips to the shoulders! And, it gives you a great place to sit! (See the second picture below.) As you did this, did you notice that your horse naturally put his or her head and neck down? I find this amazing! What do you think? A lot of training methods only focus on the headset and flexing the neck. So much time is spent on trying to get our horse’s heads and necks down and we forget about the rest of the body. When we take the time to learn how to line up all 18 of the horse’s ribs, the rest of the body comes together naturally— and just like that the head and neck come into place too! I know I make it sound easy and that is not exactly the case. First of all, you need to be able to know how to sit in the middle of your horse. We put a saddle on our horse and think all we have to do is sit in the middle of our saddle and then we can get our horses straight. It is not that simple nor does that equal straightness. When you put a saddle on a crooked horse, it does not make your horse straight. A properly fitted saddle is just a small piece of the puzzle. Many variables go into making a horse straight. Here is another exercise for you to try: Sit on your horse and line up your zipper to their mane and wither area (make sure your zipper is in the center of your body). As you do this, you should also feel if your stirrups are now even. Sitting in the middle of our horse lets us understand where our horse's ribs are pushed out and stuck. When we don't sit in the middle of our horse, we affect how the ribs stay stuck to one side or the other. This puts us in what I call a hole (the hole is usually the outside of our horse). So now you are probably asking, “Okay, so how do I do this?” The first step is you need to be able to support yourself while riding your horse at the walk, trot, and canter. This means NOT USING YOUR STIRRUPS OR YOUR REINS! The reason for this is that we need to become independent of our horses so we can influence our horse’s bodies. We do not want our horses to influence our bodies. Another common question I am frequently asked is, “How do I do this and where do I place my balance?” Ideally, it starts with a straight pelvis, which is then supported by strong core and back muscles. Just like our horses, we are all front end driven. The backside of our body is very weak just like our horses. So, we need to fix our tilted pelvis and then strengthen our core and back muscles. When we have these basic things in place, then we have a foundation to build upon. After we have built this foundation, we can now place our lower leg around our horse’s back ribs and start to feel where they are not moving and where they are only moving from center to one side. This gives us a great place to start! In summary, when you are riding your horse’s legs and not the entire body, you may experience the following six things:
If you are riding your horse's body, neither of your reins is heavy and your horse can stretch down long and low. Your horse never gets quick in the gaits. You always get the right diagonal and proper lead. Your direction changes are smooth and easy. And, your transitions are smooth and balanced. So now that you have this new awareness about riding your horse’s body and not just the head and neck, I challenge you to give it a try the next time you ride. Practice the exercises I gave you and see what your horse shows you. 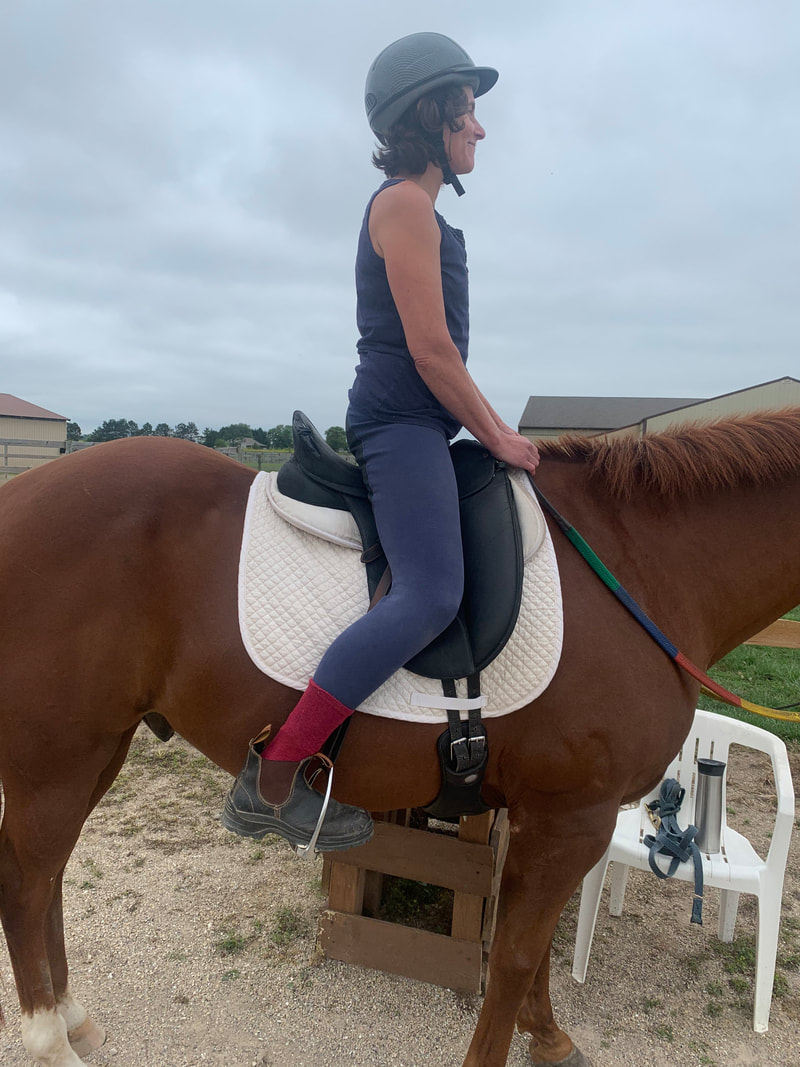 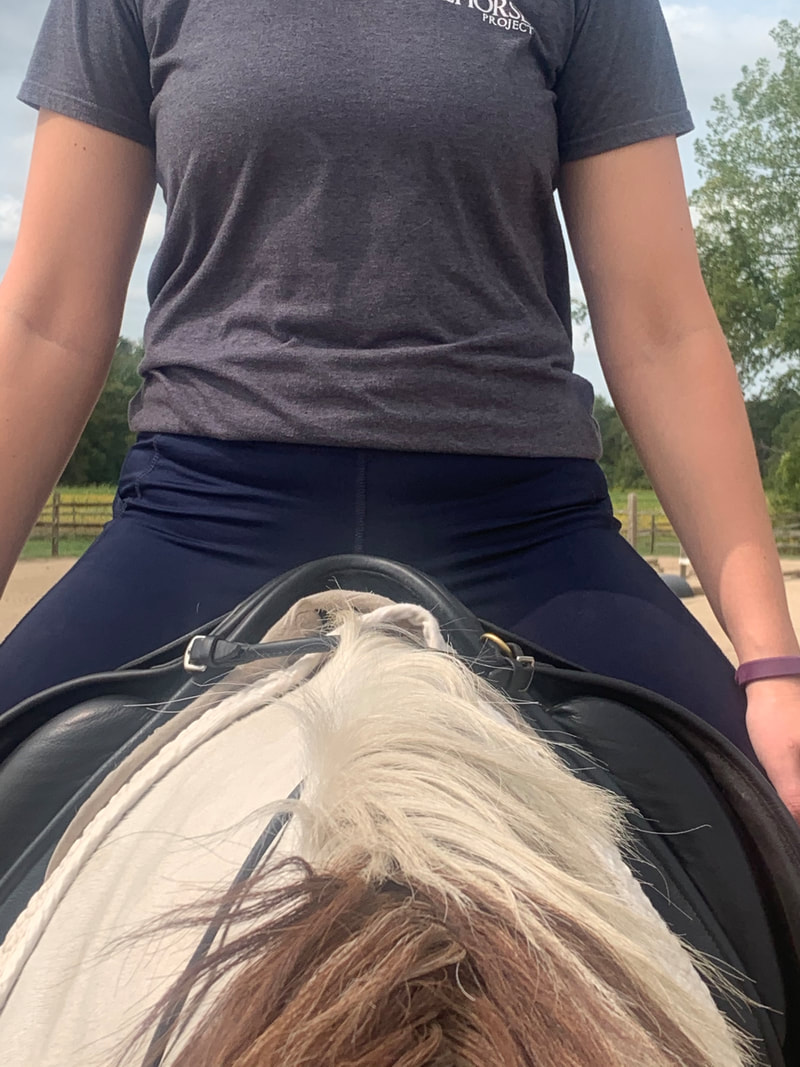
0 Comments
Are you riding your horse’s body? Have you ever wondered if you are riding your horse’s body? Do you know what that means and why it is important? In this blog, I am going to share the concept of ‘riding your horse’s body’ in more detail along with a few exercises to help you become more aware of what this should feel like. Confirmationally, the horse was never really meant to be ridden. This is something we humans came up with for our convenience. Some research has indicated that we should not have more than 120 pounds on a horse’s back including the tack. Therefore, riding centered, balanced, and correctly is pertinent to the health and longevity of the horse. The weakest part of a horse’s body is where we sit on their back. I refer to this area as the ‘bridge.’ The reason I call it the ‘bridge’ is because the horse's ribs and vertebrae are what connect the hips to the shoulder. Have you ever sat on your horse and it feels as though one stirrup is shorter than the other? Usually, it feels like the left is shorter than the right. The reason you feel this is because the ribs are pushed to one side as opposed to the other. For example: Sit on your horse and you should feel that your right leg does not have as much pressure under your calf area as your left calf does. That is because on the right side of your horse it is their ribs in their shoulder area that are pushed out against your thigh, not your calf. Then on the left side, you will feel more pressure under your calf. Each side has ribs that are pushed out further on that side and not the other. Think about it, when you ride your horse to the right your horse usually falls in with their shoulders leading and when you ride to the left side your horse tends to lead with their hunches. This is why your left stirrup usually feels shorter. Your horse’s last eight ribs are pushing against your calf. Go ahead try it, it is a very cool feeling. (Down below, you can see a picture of the left belly pushing out the rider's left calf.) So, back to riding your horse's body. As you are sitting on your horse and on the left side, their ribs are pushing out up against your calf, that is a place where your horse is not truly straight and on the right side, the ribs under the shoulder (your thigh area and girth area) are pushing out and putting pressure on your thigh. This too is another place that they are not straight. All this keeps us from connecting the hips to the shoulders, which then would allow us to connect the bridge, make our horses straight, and then build a place for us to sit. Here is another cool exercise to be able to see the bridge up and connecting the hips to the shoulders: Take a hoof pick and scratch under your horse's belly from between their front legs (the girth area) to the middle of their belly. Watch how tall they get and see the bridge connect between the wither and shoulder area to the hips. When your horse is fine with this, then get on your horse and have someone do it while you're sitting on them in the saddle. (You don’t want to do this bareback because the horse doesn’t have the muscle to support you for the bridge to come up). This is what you want to feel when you are riding your horse. This is the bridge that connects the hips to the shoulders! And, it gives you a great place to sit! (See the second picture below.) As you did this, did you notice that your horse naturally put his or her head and neck down? I find this amazing! What do you think? A lot of training methods only focus on the headset and flexing the neck. So much time is spent on trying to get our horse’s heads and necks down and we forget about the rest of the body. When we take the time to learn how to line up all 18 of the horse’s ribs, the rest of the body comes together naturally— and just like that the head and neck come into place too! I know I make it sound easy and that is not exactly the case. First of all, you need to be able to know how to sit in the middle of your horse. We put a saddle on our horse and think all we have to do is sit in the middle of our saddle and then we can get our horses straight. It is not that simple nor does that equal straightness. When you put a saddle on a crooked horse, it does not make your horse straight. A properly fitted saddle is just a small piece of the puzzle. Many variables go into making a horse straight. Here is another exercise for you to try: Sit on your horse and line up your zipper to their mane and wither area (make sure your zipper is in the center of your body). As you do this, you should also feel if your stirrups are now even. Sitting in the middle of our horse lets us understand where our horse's ribs are pushed out and stuck. When we don't sit in the middle of our horse, we affect how the ribs stay stuck to one side or the other. This puts us in what I call a hole (the hole is usually the outside of our horse). So now you are probably asking, “Okay, so how do I do this?” The first step is you need to be able to support yourself while riding your horse at the walk, trot, and canter. This means NOT USING YOUR STIRRUPS OR YOUR REINS! The reason for this is that we need to become independent of our horses so we can influence our horse’s bodies. We do not want our horses to influence our bodies. Another common question I am frequently asked is, “How do I do this and where do I place my balance?” Ideally, it starts with a straight pelvis, which is then supported by strong core and back muscles. Just like our horses, we are all front end driven. The backside of our body is very weak just like our horses. So, we need to fix our tilted pelvis and then strengthen our core and back muscles. When we have these basic things in place, then we have a foundation to build upon. After we have built this foundation, we can now place our lower leg around our horse’s back ribs and start to feel where they are not moving and where they are only moving from center to one side. This gives us a great place to start! In summary, when you are riding your horse’s legs and not the entire body, you may experience the following six things:
If you are riding your horse's body, neither of your reins is heavy and your horse can stretch down long and low. Your horse never gets quick in the gaits. You always get the right diagonal and proper lead. Your direction changes are smooth and easy. And, your transitions are smooth and balanced. So now that you have this new awareness about riding your horse’s body and not just the head and neck, I challenge you to give it a try the next time you ride. Practice the exercises I gave you and see what your horse shows you. 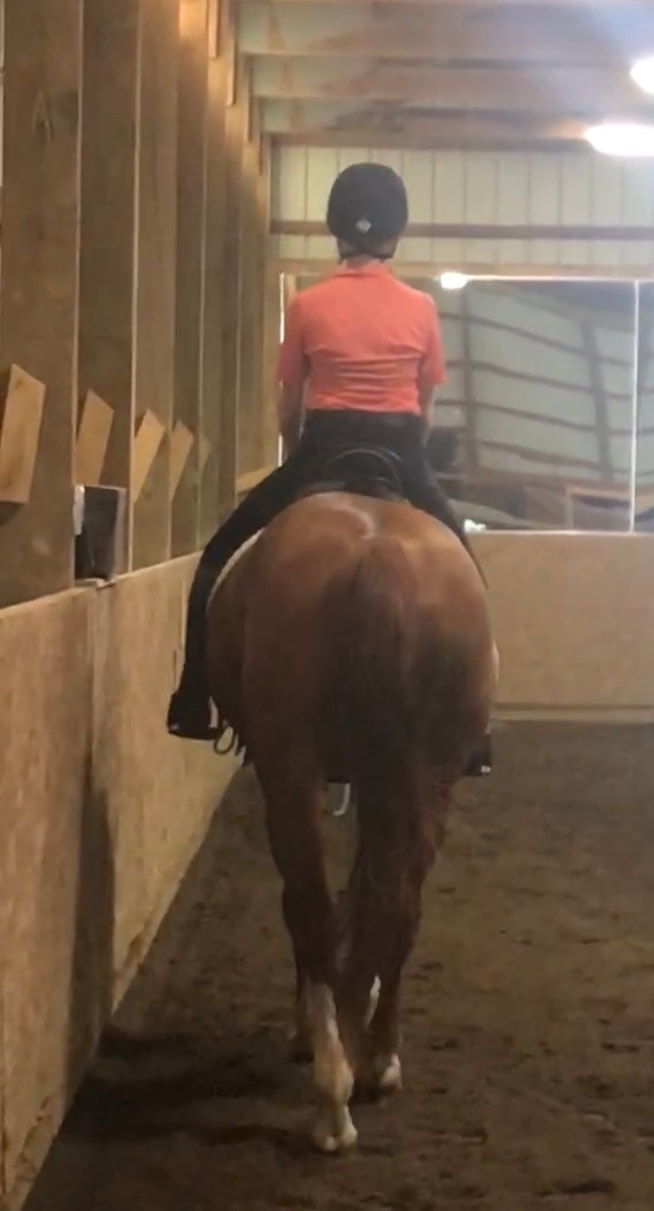 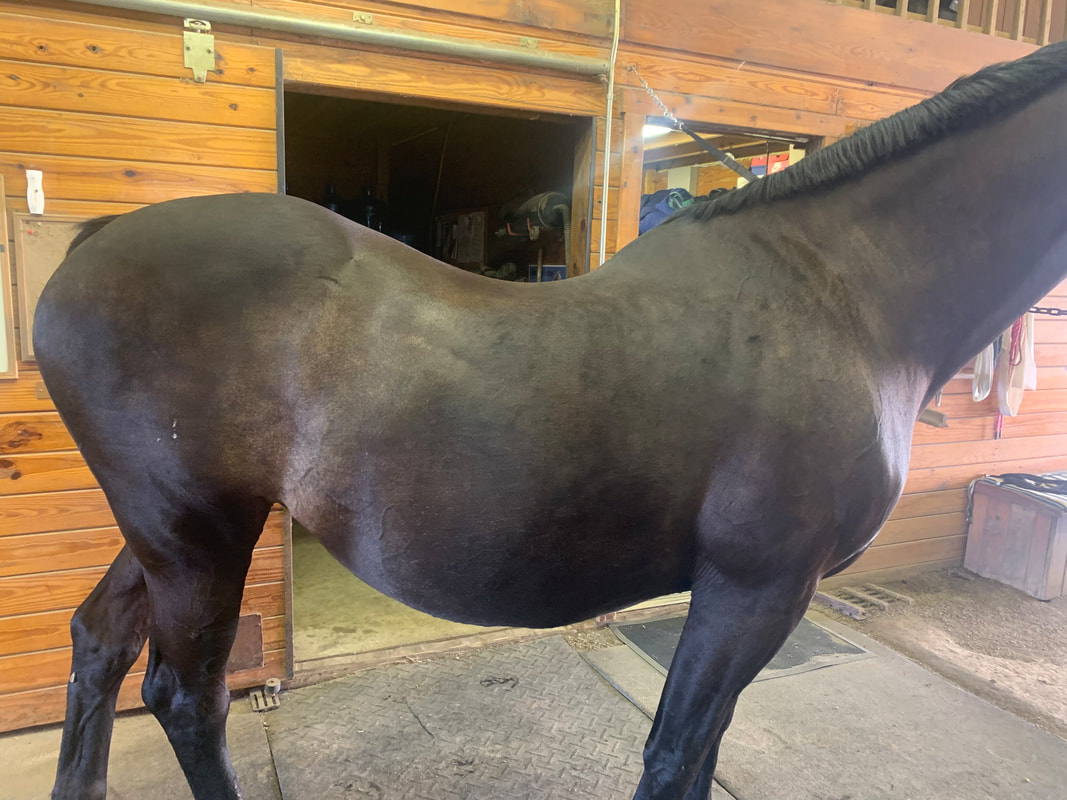 Before  After 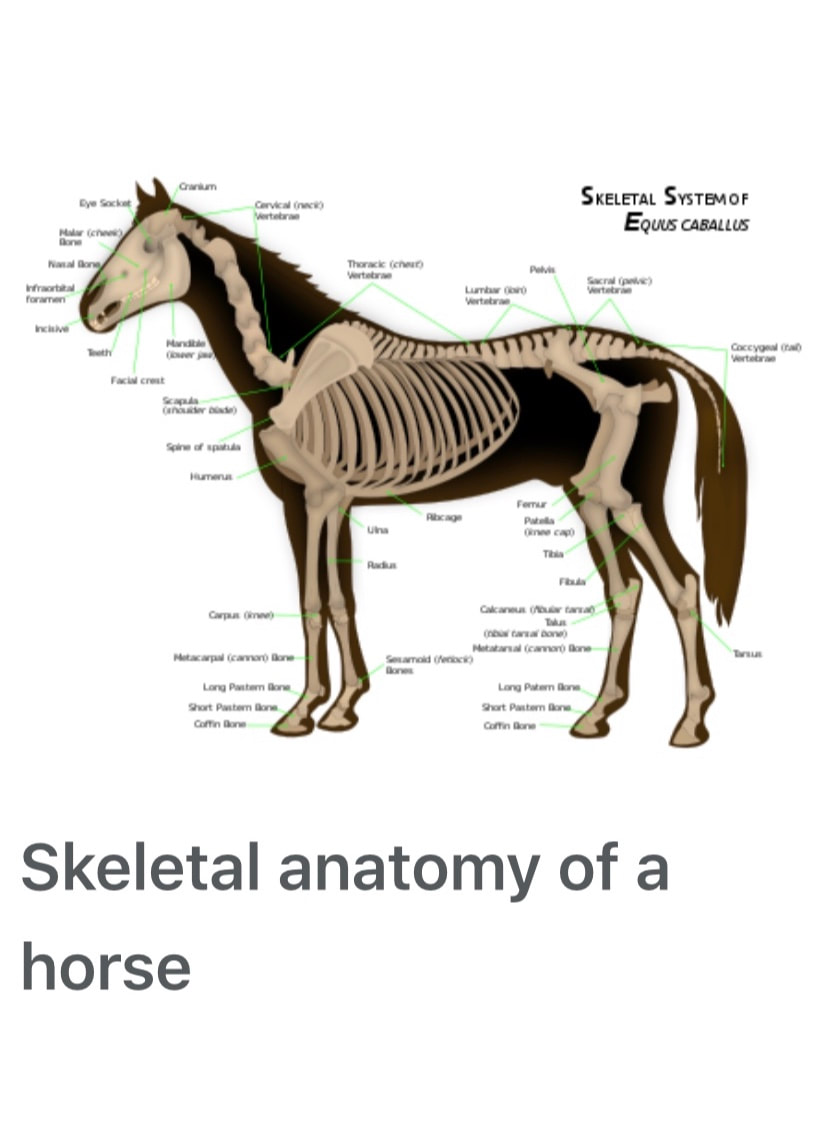 From my previous post, you should now be able to identify which side of your horse is their strong/braced side and which is their weak/supple side. (Remember, the mane falls away from the strong/braced side. If the mane falls on both sides as you look up their neck, check the section that is closest to their shoulder.) If you missed this post, click here. NOW IT'S TIME TO LEARN THE NEXT PIECE - THE SHOULDER AND THE BELLY/HIPS! THE BASICS As we've discussed, a horse has a right side and a left side, just like we do. No matter which side is their strong/braced side, a horse will do one thing on their right side and another thing on their left side. On the horse's right side, he or she will always fall/lead with the right shoulder. Depending on which direction you are going, the right shoulder will either fall in or out. How to see this when you're riding:
On the horse's left side, the part that falls/leads is their left belly/hip - the diagonal of the right shoulder. How to see this when you're riding:
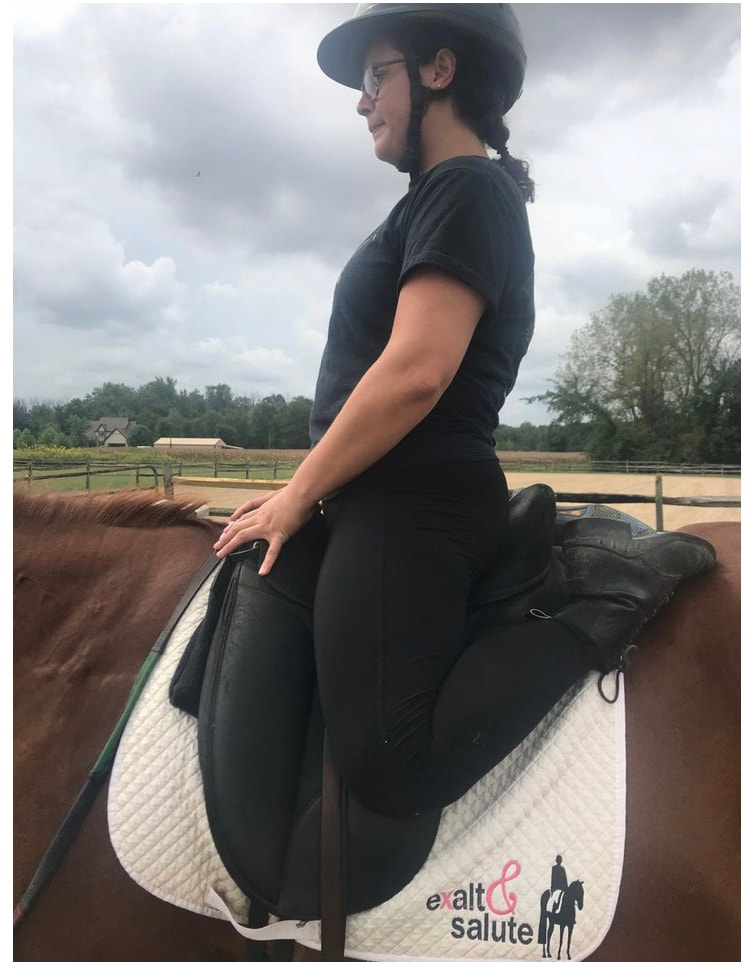
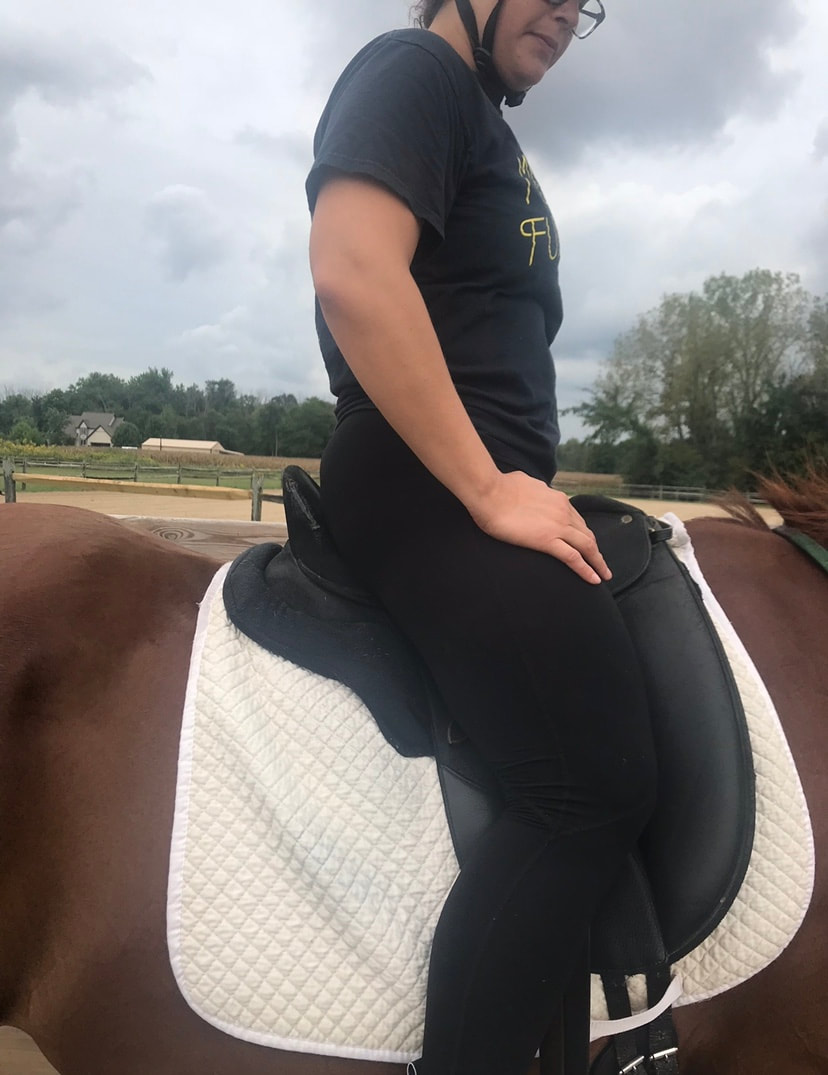
MAKING YOUR HORSE STRAIGHT Now that we know which part of our horse will fall/lead on each side, we can begin working on making our horses straight. The purpose of making them straight is so that we can start to help them carry more weight evenly through their body. If one side is falling/leading, the horse is not straight. No matter which direction you are going, your horse is going to want to balance themselves on the inside shoulder. We make a horse straight by shifting the balance off the inside and putting it on the outside. If we're going to the right, the horse will balance on the right inside shoulder. We need to first line the right shoulder up with the right hip and then shift the balance to the opposite outside hip/belly. Then you make sure the outside shoulder is lined up with the outside hip/belly. Always making sure to put the shoulders in front of the hip/belly. How do we do this? In order to help our horses, we need to understand what our body is supposed to when we are sitting on our horse. In the picture below, you will see how we are supposed to sit on our horses.
Here's where it can get a little tricky. Now we need to add in our understanding of our horse's strong/braced side. Remember, if your horse's mane falls away from their right shoulder, then the right is the stronger side or vise versa. No matter which side is the stronger side, we learned that the right shoulder and the left belly/hip will always fall/lead. IF THE RIGHT SIDE IS YOUR HORSE'S STRONGER/MORE BRACED SIDE: "The Basics" sections of this post taught us that this is the shoulder that will always fall/lead bigger or stronger more. The left belly/hip will still be a problem on the left side, but since the right side is stronger then the left side in your case, the right shoulder falling will over take everything. Whichever direction you are going, you will always need to ask the right shoulder to get in front of the hips. We need to remember that we always put the shoulders in front of the hips, never the other way around. This is because the horse's shoulders are not as wide as their hips (in other terms: a shoulder-fore).
IF THE LEFT SIDE IF YOUR HORSE'S STRONGER/MORE BRACED SIDE: "The Basics" section of this post taught us that the left belly/hips always falls on the left side. The left belly/hips will be dominant over everything, even though the right shoulder will still fall/lead. Whichever direction you are going, you will need to ask the left belly/hip to line up with the left shoulder, while using your right thigh to help with the straightening of the right shoulder.
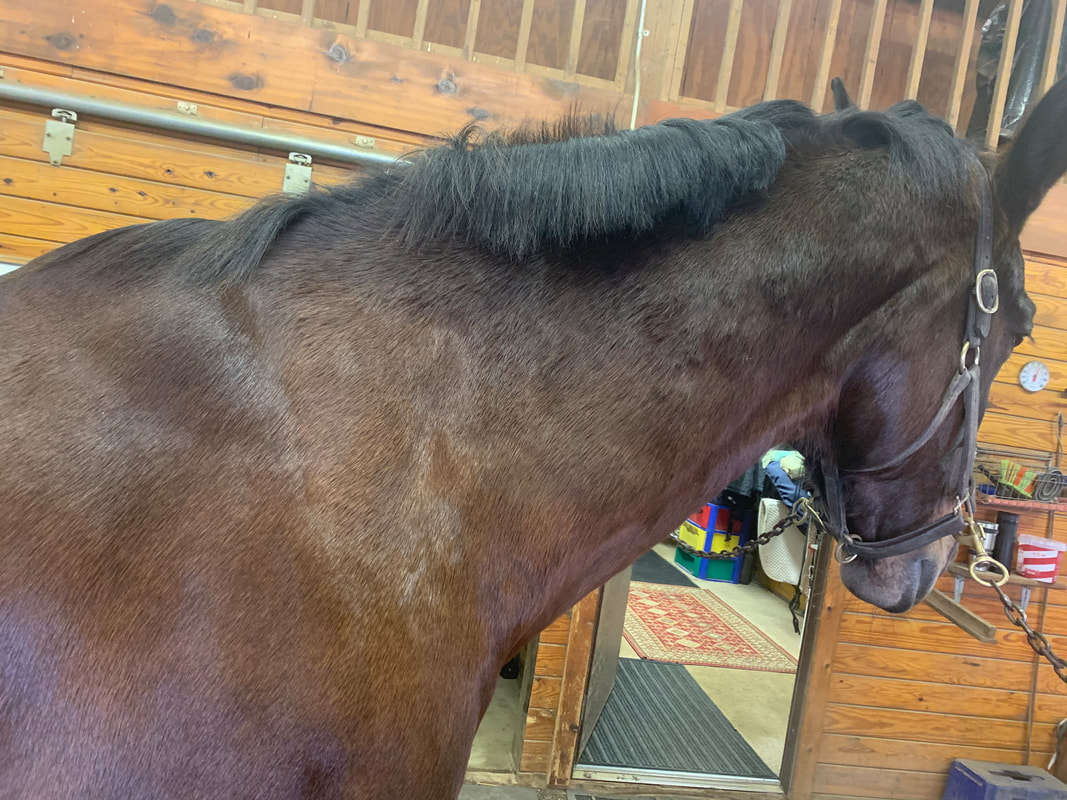
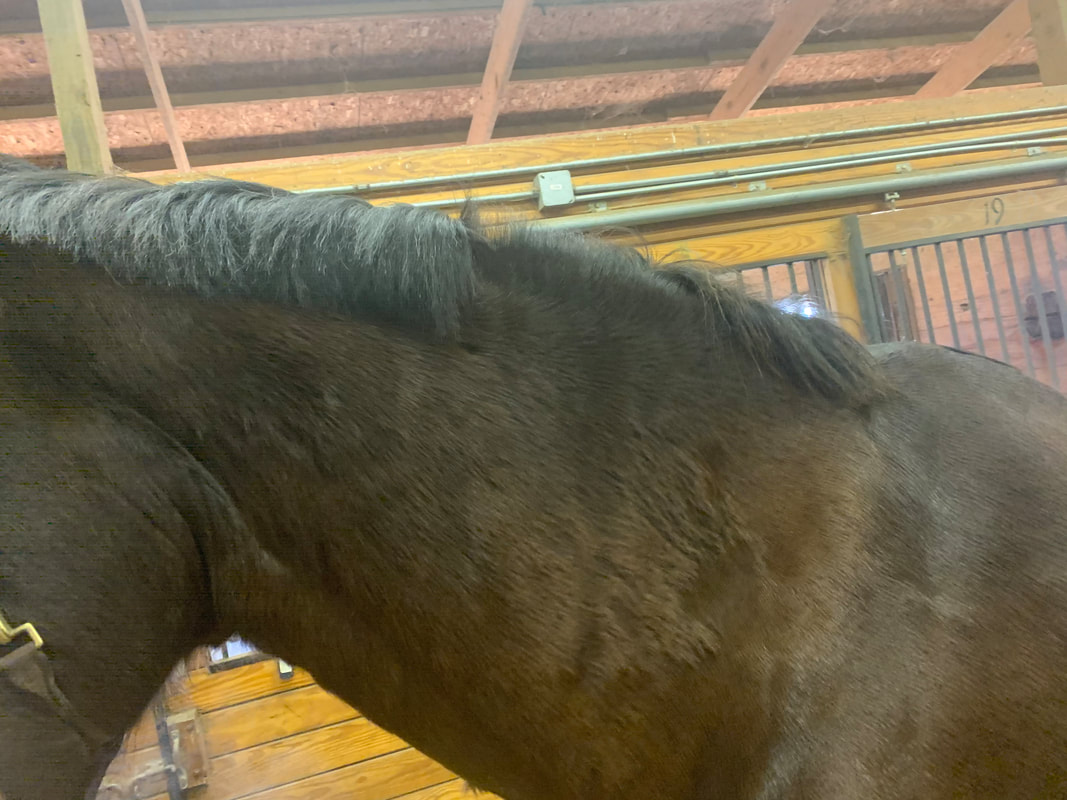
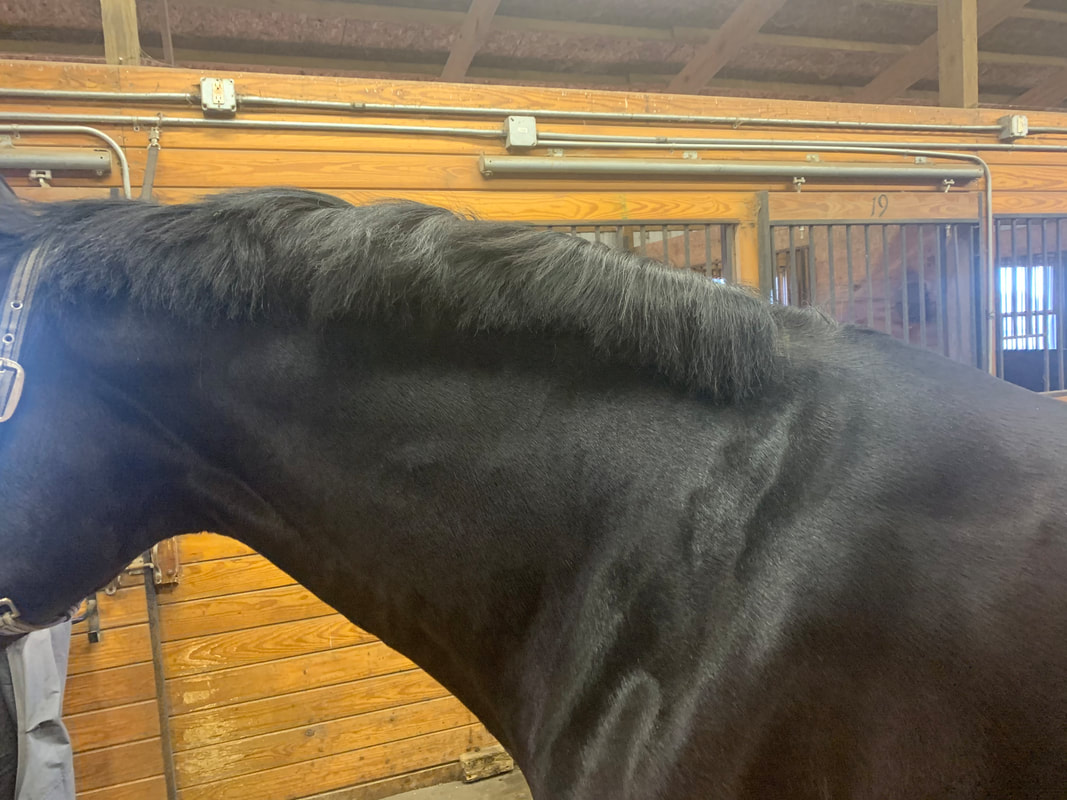
As the rider, this is why we have to have our legs in the right place and also be able to feel the pressure of the horse's shoulders and belly on our legs. We have to learn to surround our horses with our legs to give them the support where they need it, so that they can get strong enough to carry our weight. My next post will go into more detail on how to see and feel while you're riding which part of the body is falling/leading. Feeling the hips is often the hardest part since most of us always ride the front end. You can't fix the problem until you can first identify the problem! Now go out and get on your horse and start to feel where your horse is putting pressure on your legs. Do you feel more pressure on your thighs or on your lower leg? Then, remember which side is their strong/braced side of their body and know this will determine their biggest problem (right shoulder or left belly/hip). But don't forget - you still have to ride both sides in order to get a straight horse!! I pray that every ride brings you and your horse closer to understanding each other, Monet 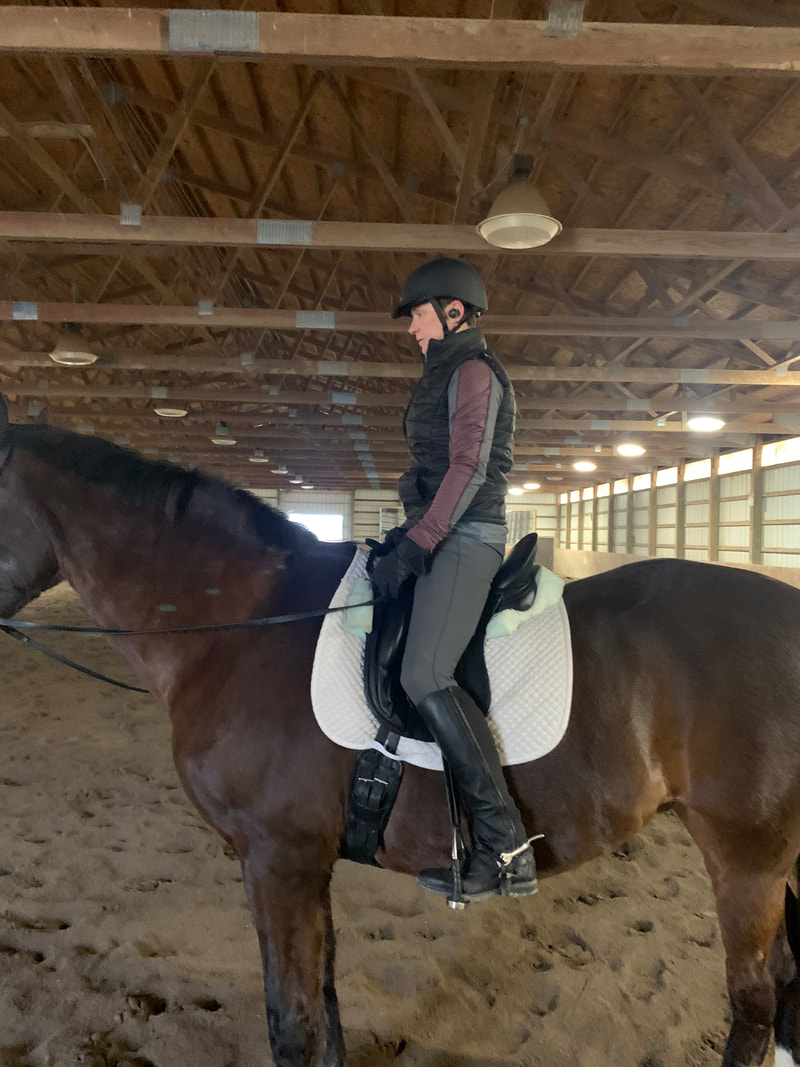 Have you ever wondered, "What should I work on with my horse today?" How about, "Why is my horse having a hard time doing something one direction and not the other?" What about, "Why is my horse heavier on one rein and not the other? Why is it always the inside rein?" I use to ask myself and others, "How do I know if my horse being naughty or if he or she just can't do what I'm asking?" Well... I FINALLY HAVE THE ANSWER! The answer is they are never naughty. They are either : 1. Not able to do the exercise we are asking them because we have not prepared them properly. OR 2. We are interfering with them while asking them to do a movement. There is a lot to understand regarding the way a horse needs to go with a rider on their backs. We first need to understand that a horse was never meant to be ridden. This is something that WE decided. In fact, where we choose to sit on our horses is actually the weakest part of their body. If we were to sit on the horses withers or even their hips, they would be able to support us better. But as you know, this is not where we sit. On top of that, we are taught to sit with a light seat. (Do we really know what that means? Stay tuned as I will be explaining this in future posts). Learning and understanding the bio-mechanics of the horse can answer any and all training problems and questions that you have. I will be doing blogs and video blogs to help you understand all of these things, so that you and your horse can have a better understanding as you ride and enjoy whatever discipline it is you do with your horse. So we are going to start out simple - What is the mane telling us? THE MANE Realistically, every problem that you have with your horse, he or she has already shown you the answer to just by which way their mane falls (along with understanding what they do on their right and left side of their bodies). Just as people are right and left handed, horses also have a preference to a right or left side. The mane always falls away from their stronger side. Yes, this is true! Below are some pictures of horse's manes going all different directions. Can you tell which side of their body is their ' stronger' or more braced side? The next time you ride, take a look down at your horse's mane and decide which side of the body is stronger/more braced. Remember, the answer to your training problems begin with the mane. Feel free to send pictures of your horse's mane if you are having trouble figuring out which way it is laying! I pray that every ride brings you and your horse closer to understanding each other. Monet In the Pictures: Both of the horses' strong / braced side is their left side. Look at the section above their shoulder. See how there is no mane? That tells you that this would be their Stronger / Braced side. If you have a horse with a long mane you will have to lift up their mane and look to see which side of their neck has more muscle. The side with more muscle would be their stronger side. Why is the trot so important.
The trot is the main gate to where your horse starts to learn how to build their balance. Reason for this is because as your horse trots it is a two beat movement. Meaning as your horse moves on one side they are using either a hind leg/ hip and on the other side they are using a front leg/shoulder. At this time we are wanting them to balance equally on both sides (aka their diagonal pair). This is not what is happening in the beginning when we are trotting our horses. What is happening is our horses are placing more weight in their front leg/shoulder and less weight in their hind leg/hip. This is very normal for each and every horse. As your horse moves into the trot they tend to lead and or pull with their front leg. Making them put more weight on their front end and not as much weight on their hind end, making this an irregular trot. As riders we are taught to rise and fall with the outside shoulder/leg. When thinking of that we are really just riding the front end. We are so focused on getting the correct diagonal, that we are not thinking on helping and getting our horses to first balance on their outside hind then leading with their inside hind and connecting to their shoulder. Which would be the start of strengthening and building their balance in the diagonal pair. Another reason for this is since our horses are what i call north bound or front end driven, we just naturally are being pulled by their shoulder/leg without even realizing it. Our horses balance is primarily on their front ends because they have a head and neck attached to their shoulders which creates an imbalance. This making them balance more with their neck and shoulders. This is conformation for why you get the wrong diagonal going one direction over another. This usually happens on your horses strong/braced side. Before we should ever sit the trot or even do much canter work, we must spend plenty of time building and strengthing their balance in the rising trot. This is truly where it all begins. Remember the canter also has a diagonal pair and if not spent enough time building in the trot the canter will also have a hard time balancing not only your weight but also their own. The next phase on why long and low is so important. Long and low not only teaches your horse to balance themselves within the gates but also even more important teaches your horse to balance their diagonal pair. Why is this so important? The diagonal pair is where it starts for your horse to be able to carry more weight on their hind ends and balance their right side and their left side of their body. Remember horses carry most of their weight on their inside shoulders/front leg. If you have read my past posts you know that your horse needs to load their outside hind in order to first balance themselves and then move forward into whatever you are asking. As we start to teach our horses how to go long and low we need to do this first without a rider. The reason for this is because your horse has to learn how to carry their own weight before they can ever carry their riders. Pretend you are going to the gym to work out. You are just starting out. Now try and grab some weights and try to do a few sets of squats. Hard right, well that is the same for your horse. Remember your horse does not know how to use their backs nor their hind ends. No more then we have a hard time using our core and backs. If you are honest you use all the wrong muscles to lift and carry thing. This is why it is so important to spend time working your horse in a round pen without a rider. This way they only have their own weight to try and manage as they start to strengthen their bodies. What does your horse look like when you are ready to work them in the round pen. First you need to have a pair of balancing side reins. I only like balancing side reins because these are side reins where your horse can find their balance depending on where they are during the exercise. Regular side reins go straight from the bit or preferably a lunging caveson to a surcingle. This making it hard to find balance in different position. Balancing side reins go from one part of your surcingle to the lunging cavson back to another place on your surcingle then creating a place where they can find their balance in many different position. You can see how they look in the first picture below. I also like to put a polo behind the horses behind to help your horse think about their hind legs and bring the under instead of out behind. Its like putting them in a box with support all around them as they start to find their own. Something you want to keep in mind as you are doing all this work, you want to be able to ride whatever you create with a soft contact as they start to reach down and strength their backs and hind end. Meaning your horse is able to do walk, trot and canter on a long rein, stretching into the contact with out rushing in their up and downward transitions. When you have this it is now time to add a rider (as long as their rider is strong enough to be able to support them selves and sit light on the horses and not interfere). Realize if you haven't spent time working on your balance and strengthen your seat, all of this work will be of no worth. So lets assume you have done this work on you and your horse and are now ready to sit on your horse. You would still be in the round pen with the balancing side reins still on. You would ride walk, trot and canter without taking up the reins, meaning riding the horse into the balancing side reins just as if they were your reins. Reason for this is to make sure you can ride the horse into the contact without interfering with the horse. If you are able to do this then congratulations you have just learned how to ride a horse into the contact, another words, riding the horse from back to front). Now you can take off the balancing side reins and polo and work on getting your horse stronger and doing movements or even starting over fences. Its all about what your goal is for you and your horse. So go and have fun with your balanced horse. You now have the most important part of your foundation. 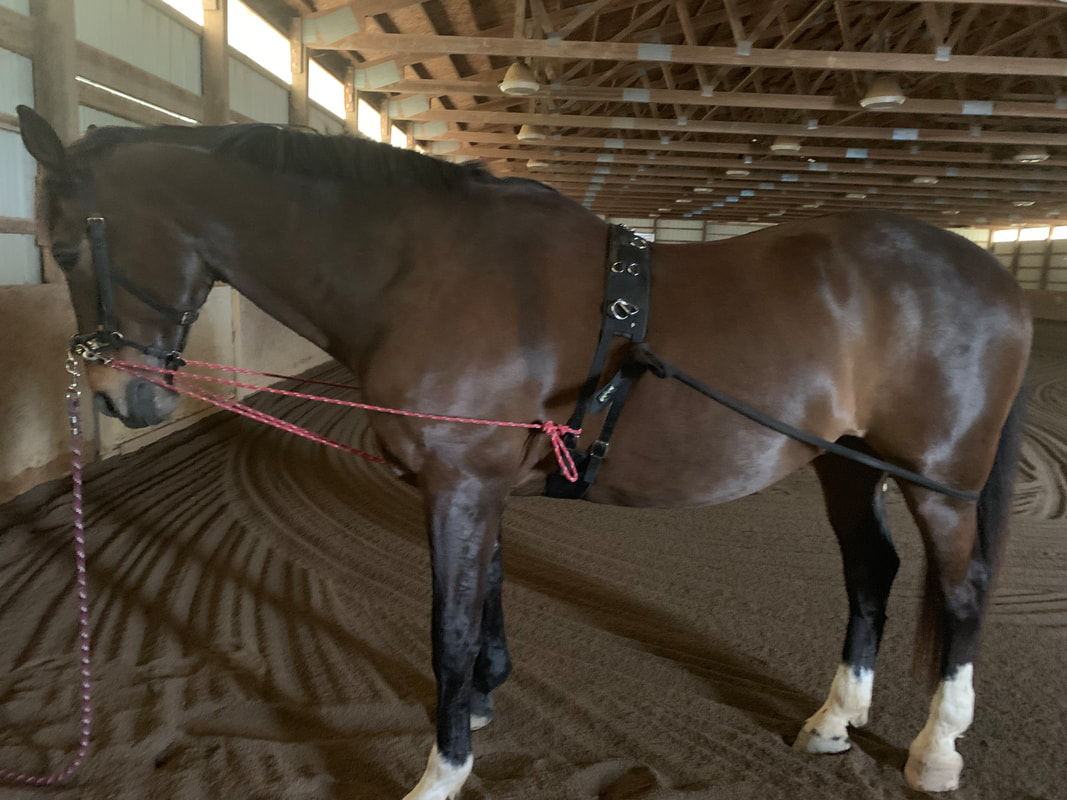 Why is long and low so important. Long and low is where your horse first starts to learn to lift their backs, drive from behind and seek the contact of the bit. This is also the place that they learn to begin to balance themselves and then their riders. Most horses and riders do long and low incorrectly. When this is done correctly, your horse will be able to lower their neck out of their shoulders from the 7th vertebrae, not the 5th (the 5th vertebrae is where most horses lower their neck). In order for our horses to be able to do this, their shoulders need to be straight so that 5,6 and the 7th vertebrae, which is attach to their sternum, then to their first 5 ribs can lift. The next step would be your horse can now lift their withers, then their backs and then drive from their hind ends and step into the contact, aka the bit. Another phrase that i use regularly is "A kinked hose". Just like a kinked hose, you have to straighten out the kinks before the water can flow all the way through, from one end to the other. This is also true when it comes to your horse. Before you can get a horse to step into the contact and come over (or through) their backs and drive from behind, you have to get the kinks out (meaning straighten your horse). This always starts from the front to the back so you can then ride them from the back to the front. The first picture is a picture of the skeleton structure of the horse. Here you will see vertebrae 5,6 and 7. See how they are in a U shape. This is why most horses only lower from the 5th vertebrae. In the second picture you will see how this horse is stretching out of his shoulders but not lifting his back and driving from his hind end. In part two I will show you how to accomplish getting your horse to lift their backs and drive from the hind end. 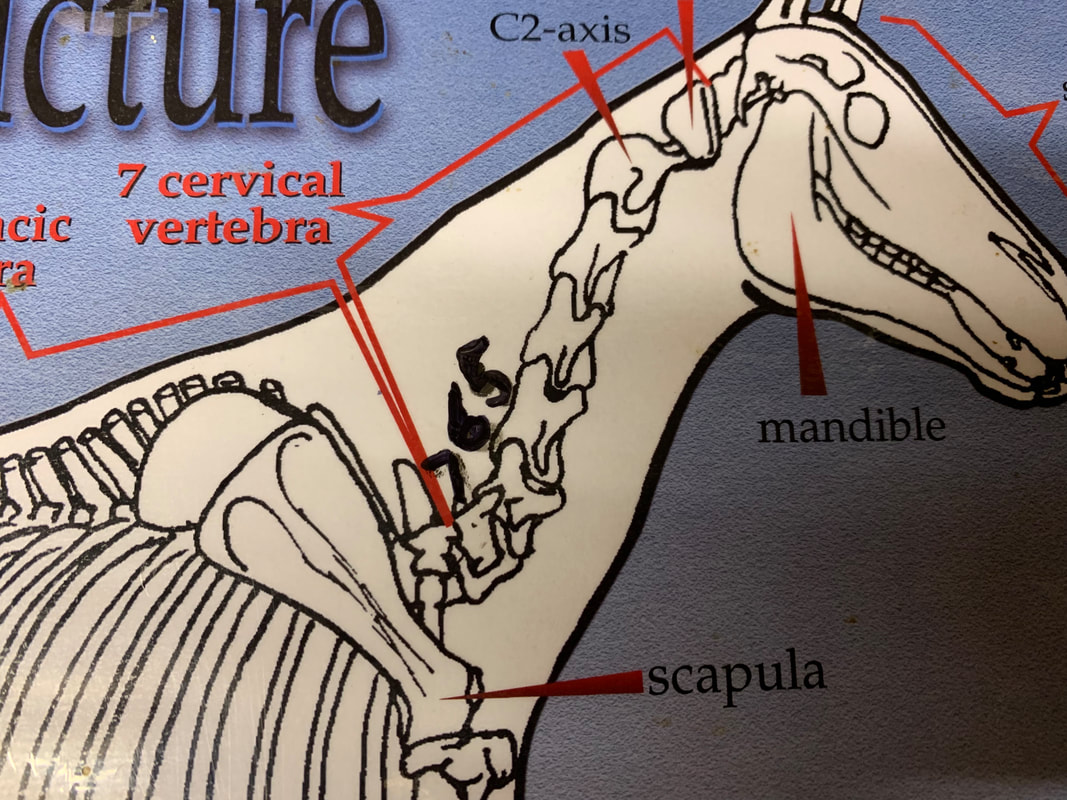 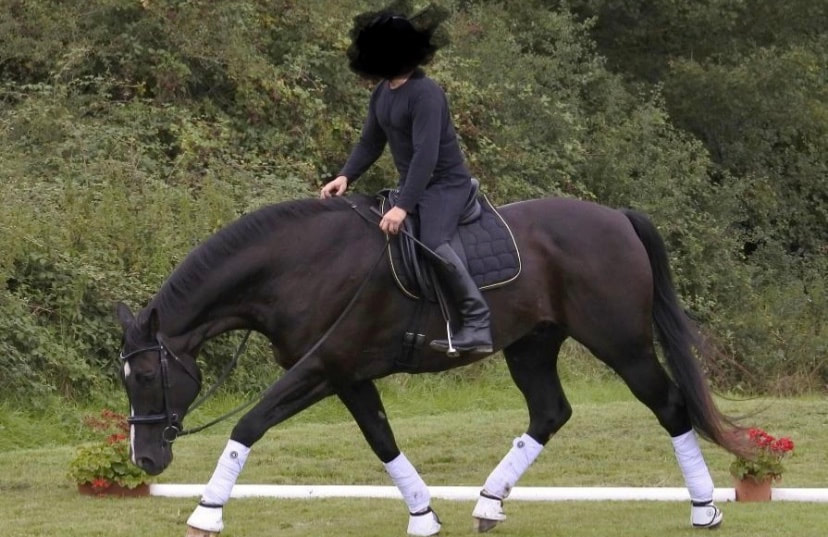 Well now that you are spending time working on strengthening your seat its time to understand what your horses body is telling you about their strong/braced side and their weak/supple side. Have you ever looked at a horse and wondered why their mane lays on one side or it lays all over the place? Well there is a reason for that. These are areas that tell us where they are braced or where they are weak. This is the starting point to your horses road map. Just like us your horse uses different parts of their bodies to balance themselves. For instance if you are right handed, your strong areas will be your right arm and your left leg. You right knee would be what you would use on your right side to move forward which makes your right hip your weakest part of your body (just like your horse). So back to your horse. Ever horse has a strong/braced side and a weak/supple side. When you look at your horse, the side that has the most mane on it is your horses weak/supple side. Meaning this will be the side that you can flex their neck easier and the rein that has very little weight or less brace on it. This will also not be the rein that you will gravitate to unless it is your inside rein. Most horses mane will probably lay on the right side. Also confirming why the right lead is the lead that gives people the most problem to pick up. As we start to study our horses and understand where they brace and where they fall to the in or outside of our circle, we can become more prepared to helping them become more balance and are able to carry us as their riders. Helping you to understand easier we are going to look at the horse that has their mane on the right side and nothing on their left side. I use a term "Northbound" when i talk about how horses move. This means that a horse uses their front end to go forward. When ever you have weight or other words a strong inside rein, that is where they have all of their balance and this is where they are moving forward from (Northbound). Their balance should ALWAYS, i will say it again ,ALWAYS be on their outside hind. This is where they need to carry their weight so they can pick up the proper lead or put you on the right diagonal. Horses were never meant to be ridden but since we choose to do so, it is our responsibility to help them learn to balance their weight on their outside hind not on their front end (head, neck and shoulders). This is how we can help them carry our weight when we are riding them. This is why it is so important that we spend so much time developing and strengthening our seat and gettinh our bodies independent from our horses. I have a saying "Our horses can only be as strong as their riders". So i don't overwhelm you with to much information we will stop here. So go out and see where your horses braced/strong side and their weak/supple side. Also as you ride feel which rein is the one that is the heaviest. Also look and see which side you have the most trouble getting the correct diagonal. No cheating now, as soon as you ask your horse take that first trot step you need to be going up and leading them in their trot. Another words don't wait a stride to pick up the proper diagonal. Remember the reason for this is this will be the strong/braced side of your horse. This is where they will carry most of their weight and leading with instead of balancing on their outside hind. All of this information is here to help you understand who is influencing who and why is your horse doing these things you don't want. Remember YOU are the LEAD dancer. YOU are the one who influences the horse not the other way around. So go out and have fun. This is a journey. May all your rides be GREAT!!!!!  Here we are for phase two on developing your seat. So i hope everyone has spent time doing this exercise and can really feel the difference between a heavy seat and a light independent seat. I am sure you are asking yourself "How am i suppose to do this and really ride"? Well when your seat is truly independent (meaning not using the reins nor the stirrups for balance) . Trust me you will be able to do this with lots of practice and patience. It does take time time to be able to get strong enough but well worth it. Remember we are expecting our horses to be strong and balanced which only happens with long and hard work. I have a saying "Our horses are only as strong as their riders". So you can do this for you horse. One of the most important pieces to an independent seat is that you have a straight pelvis and a strong core. These two things go hand in hand. You can't have one with out the other. Your core is so important to a independent seat and if your pelvis is not straight YOU CAN NOT ACCESS YOUR CORE!!!!!! So your probably thinking how do you know if you have a straight pelvis and if not how do i get one? Look at the first picture below. This is how a straight pelvis should look like. You will have to spend time doing this exercise and then be able to do this all day long without thinking about it. Realistically this is how your pelvis should be ALWAYS. Good luck it is really eye opener once you realize how hard it is to keep, but i believe you can do it. This won't only help you in your riding but also in the rest of your life. This is a big part of having great posture. When you are ready to put your feet back into the stirrups you will start putting only one in at a time. You will start with putting your inside foot in the stirrup first and your outside leg will remain behind the back of the saddle. The reason for this is because we need to strengthen our outside leg which is a big part of our outside aids. When you look at the second and third picture, this is a picture of how you will put your outside leg back behind the back of the saddle and ride. I will cover more on why this is so important later on. Spend time either on the lunge line or in a round pen while working on your balance and gaining an independent seat. This way you don't have to think about steering at the same time. Be patience, I promise you it is very hard but well worth it. You will see in the pictures below on how much of a difference keeping your outside leg up does. Best of luck to you all on your journey. If you stick with all that i am teaching you i promise you will definitely notice a difference not only your riding but also in your horse.  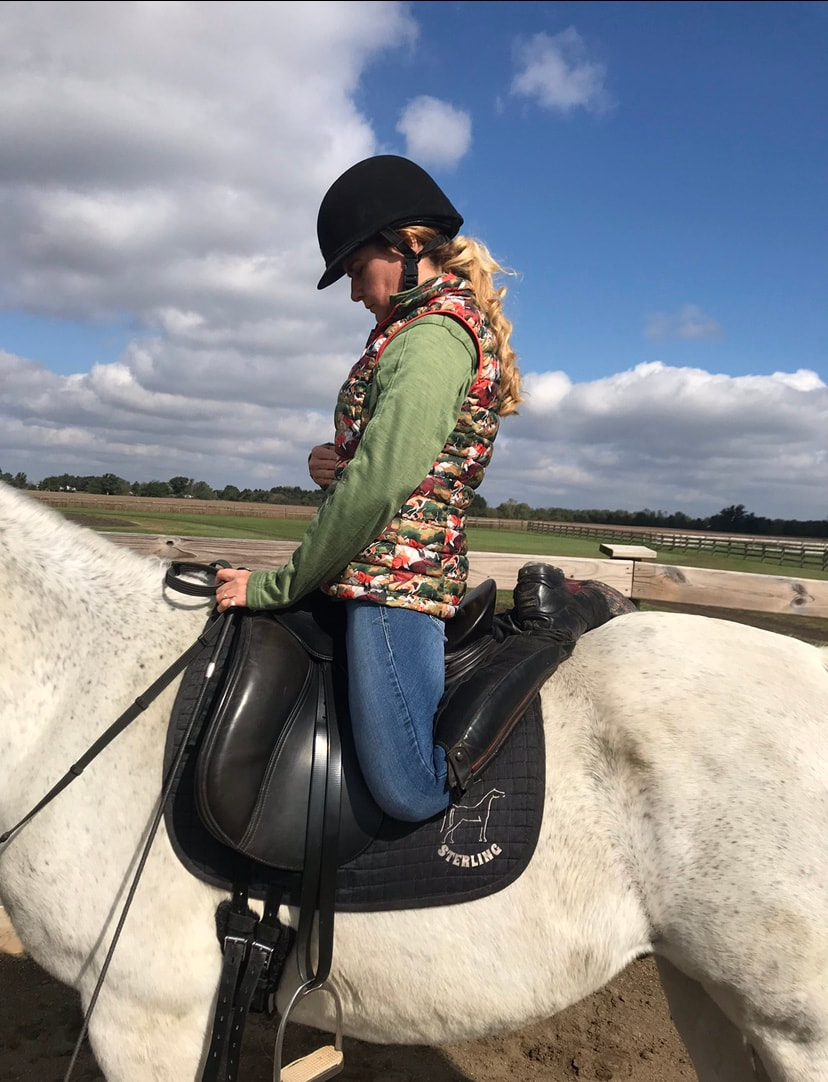 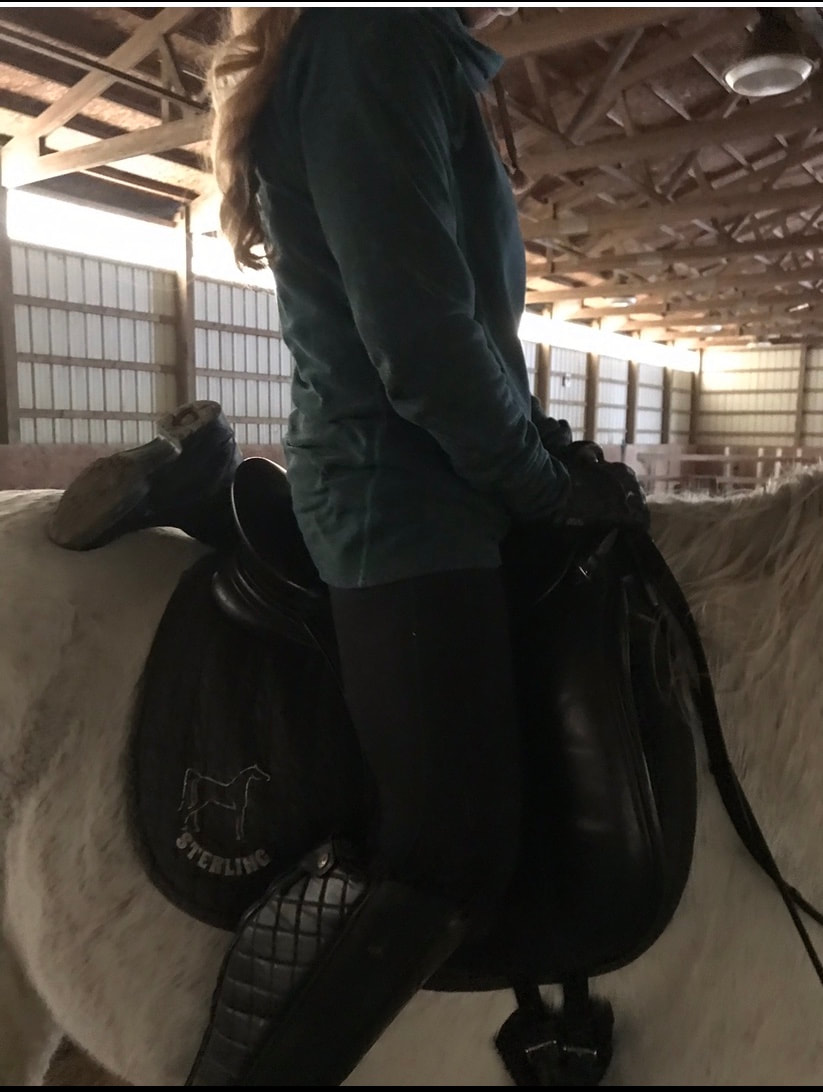 There is so much information regarding Bio-Mechanics of horse and rider that i really don't know where to start. |
AuthorWrite something about yourself. No need to be fancy, just an overview. Archives
September 2020
Categories |


 RSS Feed